Welcome to IToxy.com

Hi, Welcome to IT Oxy. This blog is primarily aim to share our information on Information Technology. I really appreciate if you are willing to give any input to this blog. If you want to share something, email at: admin@IToxy.com If you found any post interesting and useful, then please leave a comment and share with your friends.

Recover My Files

Recover My Files is computer data recovery software. It will recover files which have been deleted and emptied from (or bypassed) the Windows Recycle Bin.

Recover My Files will find any type of deleted file, however it will also search specifically for file types that you nominate. Recover My Files will also find drives that are corrupt, no longer recognized by Windows, formatted, and even drives that have been formatted and a new Operating System installed.

Recover My Files does not alter the contents of the drive being searched in any way so you can perform safe data recovery.

The version of Recover My Files that is downloaded from our website is fully functional. It will allow you to preview the contents of the files that it has recovered from your computer. However, you must purchase a product activation key before you can save your files.

It is not currently possible to save files to the drive on which they were deleted. You must save them to other storage media (eg. Second hard drive, floppy disk, USB drive, network, CD or DVD etc).


Recover deleted databases and financial files:

  • Access Database ( .mdb)
  • Access Project ( .adp)
  • Ancenstry Family Tree ( .aft)
  • CanTax T1 Personal ( .p96 .p97 .p98 .p99 .p00 .p01 .p02 .p03 .p04 .p05 .p06 .p07)
  • CanTax T2 Corporate ( .c96 .c97 .c98 .c99 .c00 .c01 .c02 .c03 .c04 .c05 .c06 .c07)
  • DBase-FoxPro Database file ( .dbf .scx .dbc)
    EndNote ( .enl)
  • FLG File ( .flg)
  • FoxPro Executable ( .fxp)
  • Interbase Backup ( .gbk)
  • Interbase Database ( .gdb)
  • Lacerte Tax ( .mdx)
  • Lacerte Tax Individual ( .id0 .id9 .sd0 .sd9 .pd0 .pd9 .fd0 .fd9)
  • Microsoft Money ( .mny)
  • MS-SQL Server Database ( .mdf)
  • MS-SQL Server Log ( .ldf)
  • MYOB Data ( .dat .prm .pls)
  • Omnis Database file ( .df1 .lbr .ohf .lbs)
  • Quickbooks Backup file ( .qbb)
  • Quickbooks QBW file ( .qbw)
  • Quicken QDF file ( .qdf)
  • QuickTax file ( .q99 .q00 .q01 .q02 .q03 .q04)
  • SAS ASCII Data File ( .sas)
  • SAS Binary Data file ( .sas7bdat;sd2)
  • SPSS ( .sav)
  • TaxAct ( .ta5)
  • TaxCut file (2000-3) ( .t00 .t01 .t02 .t03)
  • TurboTax file ( .tax)
  • - Recover iPOD Files
  • Recover deleted music and video, including .mov, iTunes .m4a, .mp3 etc.

here Or here Or here Or here or here

Change Your Windows Registration Name

If you bought a previously owned computer, there is a good chance that Windows still says it is registered to its former owner.To remove that name and insert your own, you must edit the Windows Registry:

1. Click the Start button in the lower-left corner of Windows.
2. Click Run.
3. A window will appear.Type regedit in the blank, and then click the OK button or press the Enter key.
4. The Windows Registry Editor opens. In the left window pane, double click the HKEY_LOCAL_MACHINE registry key. If you can’t find it, do the following

    a. In the left window pane of the Registry Editor, scroll to the top.
    b. If any of the HKEY registry keys are open—as indicated by a minus sign (-) on their left side—then close them by clicking that minus sign. When a registry key has been properly closed, it will have a plus sign (+) next to it.
    c. Repeat this process for the remaining HKEY registry keys until the only things visible in the left window pane are the five HKEY keys
    d. Double-click the HKEY_LOCAL_MACHINE registry key.

5. A new column of registry keys appears. Double-click Software.
6. A long column of registry keys will appear. Scroll down until you find Microsoft, and then double-click it.
7. Another long list of registry keys appears. Scroll down and double click Windows NT.
8. Click the CurrentVersion registry key.
9. In the right window pane, double-click the RegisteredOwner registry value

image

10. A window opens. Under the Value Data heading is the name of the previous owner. Delete it, and then type your name in the blank.
11. Click the OK button.
12. Above RegisteredOwner, double-click the registry value named RegisteredOrganization

13. Under the Value Data heading is the name of the previous owner’s employer or organization. Delete it, and then type the name of your organization (or you can just leave it blank if you want).
14. Click the OK button.
15. Exit the Registry Editor by clicking the X button in the upper-right corner.

A Free Security Software to Hide Folders

Windows have a folder lock security feature, but this integrated function has a lot of shortcomings, it is hardly usable on network because sys admin can easily view the content of the locked folders, anyone who has an access/login on your computer can open locked folders, it doesn't support FAT32 and it doesn't work on Home edition of Windows. Furthermore, locking folders means that all users that has access to your computers can still see those folders.

Hide Folders, on the other hand is not meant to lock the folders with predefined password, it is meant to simply HIDE them, so no one can even know of their existence. It is simply more efficient not letting anyone know that you even have some confidential folders. Secondly, you can password protect the application so no one can open Hide Folders to unhide your hidden folders. Remove the Hide Folders from the programs menu and 99% of people wouldn't even know that you have a folder hiding program installed on your system.So by  using this application hided folders can not be accessed, viewed, searched or deleted .

Hide Folders Features

  • Securely hide folders with your confidential data
  • Works on Windows XP and Windows Vista, supports NTFS, FAT32 and FAT file system.
  • Password protection - folders can be unhid only after entering a password within the program.
  • Hidden folders can not be uncovered by deinstalling the program.
  • Unlimited number of folders can be hidden.
  • Folders are hidden even in Windows safe mode.
  • Fast and user-friendly skinned user interface.
  • Intuitive for usage, no learning curve.


  • Sys Req :Windows XP, Vista, 2003|Freeware |1.43MB

    HideFolders

  • PDF Owner Guard Personal Edition

    When you want to send a sensitive document via e-mail or make it available to many people, you have to consider what restrictions, if any, to apply to it so it can't be misused. PDF OwnerGuard is a reliable digital rights manager and data protection system.

    Features

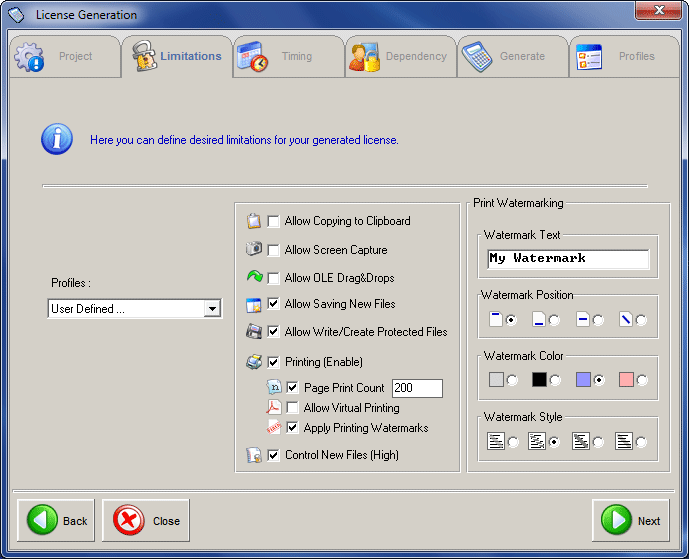
    • The protection system lock your PDF documents to specific machines

    • Control and apply limitations for viewers using a unique DRM component called License Manager. This minimizes viewers' DRM hassles by letting them access your DRM protected files offline.

    • The encryption and protection method is based on an advanced 256-bit AES encryption system.

    • These protected files are just like normal files, and users do not need to run any additional application to access them or to have

    • You can place on your files include working time, expiry date, and print and save functions.

    • Users can lock the files to specific computers, and encrypt and protect new output files too.

    • Use of the clipboard, screen capture, dragging & dropping, and write  can be restricted and create permissions.

    • A license code can be generated by the user and copied to the clipboard by pressing a button, and you can share it with your intended recipients separately.

    When compared to the security and encryption features provided by Adobe’s DRM method, OwnerGuard gives more for the buck. Apart from access limitations, license expiration and machine dependency support, it also provides support for encrypting newly created files. Creating a protected file grouped by projects is easy with a wizard that guides you through all the steps.

    Once you have created a project, associate a license with it by placing limitations on any PDF files produced under that project, then add files, and finally click the ‘Protect Selected Files’ button. The License Manager lets you view, access and distribute your custom computer ID.

    SysReq:WINDOWS XP/2000/98|Freeware

    PDFOwnerguardPersonal

    Double Vision - Watch Online Video While You Work!

    Bored with  data entry job / some other  job  for few hours and looking for a way to make it more interesting ? Double Vision allows you to watch Hulu, YouTube, Netflix, Blockbuster and more directly within a Microsoft Excel window.

    When you load a video using the browser from one of these sites, the video will expand to the size of the browser so you aren't stuck looking at a video surrounded by text. With this you can watch online videos without impacting available space on your computer monitor and without interfering with programs already running.

    To use Double Vision, simply navigate to any website where you would normally watch an online video. Once you have started playing the video, click the "Go Double Vision" button and you will enter "Double Vision Mode". While in "Double Vision Mode", the browser window will be transparent and you can 'click-through' the browser and interact with programs that are running underneath them.A small Controls window will be displayed on the window which will let you change the transparency, move the window around your desktop and exit "Double Vision Mode".

    | Freeware | Windows Vista, Windows XP | 2.15 MB

    http://www.godoublevision.com/

    Prevent Unauthorized use of USB Ports

    If proper steps are not taken to secure your computing environment, a USB flash drive would be an ideal means of collecting valuable information and literally pocketing it. So what steps can be taken to secure your environment against these potentially sinister little devices?

    The freeware NetWrix USB Blocker enforces centralized access control to prevent unauthorized use of removable media that connects to computer USB ports, for example, memory sticks, removable hard disks, iPods, and more. USB port access control is a very  important aspect of your endpoint security, no matter how good your antivirus and firewall are. The USB device lockdown protects your network against malware and prevents theft of sensitive corporate data.

    Unlike other solutions, it requires no deployment of agents on client computers. Another advantage of the tool is simplicity, only a couple of mouse clicks to get the work done. And the most exciting: the software is completely free of charge.

    Benefits:
    1) Prevents unauthorized use of removable devices.
    2) Hardens endpoint security.
    3) Enables regulatory compliance, such as SOX, GLBA and HIPAA.
    4) Freeware! Saves your IT buck for other important projects.
    Features:
    1) Seamlessly integrates with Active Directory.
    2) Requires no client deployment (no agents).
    3) Fully centralized management.
    4) Very simple to use, no monster tools and long learning curves

     NetWrix USB Blocker | Freeware | 795 KB

    Shut down a computer at a specific date and time

    Download movies or other files from net will take some time to complete and we can’t really afford to just sit there and wait for the downloading to be finished.What we usually  do is we tend to leave the computer in power ON condition to download the file until we are back from outside or wake up in the early morning, then only turn it off once the downloading process has completed. In actual fact the downloading process may only take 1 or 2 hours but you may end up leaving it ON for whole night. Have you ever thought to have a tool that can help you auto shutdown your computer once the downloading process is completed?

    Mortens ShutDown is a very interesting free tool to shut down a computer at a specific date and time. It is simple to use: Setup a time when your computer shall shut down and run the application. There are several shut down modes supported as there are a simple user log-off, or restart or shutdown or power off the computer. Running applications that would prevent the computer from shutting down can be automatically killed. You can setup -Mortens ShutDown- to warn you before it really shuts down the computer.

    image

    In addition this tool can be used to control the launch of any application (from a remote computer) via an INI file. This allows e.g. the following:
    Setup a folder from where -Mortens Shutdown- will poll an INI file and react on changes made in it. If you setup this folder as a network share, you can easily modify any setting (e.g. application to launch) remotely.

    While -Mortens Shutdown- is running on the remote machine you can setup an application to launch within the INI file. Once you have set the "launch" flag in the INI file -Mortens Shutdown- will trigger the launch of the requested application (script) on the remote machine

    MortensShutdown | OS:  Windows All | Freeware| 1.08MB

    Insert Tables in Word 2007 with out touching mouse

    Here is trick to create columns in MS Word with out touching the mouse.

    Just type +------------------+------------------------+----------+----------------+ and PRESS ENTER.

    Word will automatically insert a table.


    To add a new row just hit tab again when you are in the last column to the right. You can add as many rows to your table (box) as you want using this method. The + symbol indicates a column break, and the --- symbols indicate the width of the column you want the table (or box) to be.

    How To Listen Free Web Radio On Google Talk

    There are thousands of digital radio channels on Internet that you can listen while browsing the net. Through an excellent VOIP service you can listen to countless radio channels via Google Talk.
    GTalk2VoIP is a popular service offering VOIP and SMS services. Since most of the web radio stations are free you can use this service to listen radio stations via Google Talk.
    Start with adding service@gtalk2voip.com to your buddy list in Google Talk. Once this bot appears online, type IM RADIO or HELP command to display the number of available radio channels. The available radio channels will be prefixed by a number (id) identifying each station uniquely. To listen a particular radio station, simply send a command RADIO (number/id). For example, RADIO 137. A call connection will be established and you will asked to pick the call. Accept the call and enjoy the radio station.

    Auto Reply For Gtalk, Yahoo Messenger, MSN and AIM etc

    Answer.im is one of useful FREE online service which works as a auto reply answering machine for your Instant Messengers like Yahoo messenger, Google Talk, MSN, AIM and ICQ.

    This service could be really useful to auto respond to the messages on your instant messengers in case you are away from your computer or busy in doing some other important work.

    It works in the following way mentioned below

    1. Go to answer.im and Login through your instant messaging account credentials.

    2. Setup your online account status and type in your answer text and click Save Changes button.

    3. Click Exit, to exit but your account will stay online, and respond to messages by your friends.    

    This service will auto respond to all the messages by your friends and contact list even if your computer is switched off.

    Check out answer.im

    Free Password Protect Files Program For Windows

    One of the most important feature which almost every windows user wants in windows is to protect the private files with password. Many people keep some of the very sensitive files on their hard drive and other portable drives which they don’t want other to see.

    Androsa  is a free password file protector to protect your confidential documents or any other file with a secret password. It lets you lock any file in windows with a secret password.

    When ever you password protect any files with this program it will convert the file into an encrypted file which can be opened only with software and de-protected by entering the correct password. You can select among different encryptions method at the time of password protecting your files with this program.

    Let’s see how simple you can password protect any program with this software.

    This free password protect program get integrated with the context menu’s in windows so you can encrypt any file just by right clicking on that file.

    1. Right click on the file which you want to password protect, select Androsa FileProtector System.

    2. Now select the encryption algorithm you want to use and enter the password and click Protect.

    3. That’s it your file is password protect now. :)

    This free password protect program also lets you password protect files on your portable USB drive, you can download the portable version of this program from here

    Free password protect Androsa FileProtector is a free to use program which does not contain nay adware, spyware or malware etc.

    Download Androsa FileProtector

    Free Data Recovery Software For Windows

    It happens many times when you or some other person delete some important files or folders from your hard drive, pen drive or memory card and you feel helpless as you don’t know how to recover the deleted file.

    DiskDigger is another free data recovery software which recover files from any type of media including USB flash drives, memory cards (SD, CompactFlash, Memory Stick, etc), and your hard drive also.

    This program can recover deleted files including photos, videos, music, documents, and other formats also.

    diskdigger

    DiskDigger is a free portable tool, does not require any installation as you can simply run it through the simple program executable.

    After running DiskDigger you need to select the drive and file types and click Next and retrieve the file from the list is files shown.

    image

    Download DiskDigger

    Add Folder or Application In My Computer and Control Panel

    Folder2MyPc is a FREE utility which allows you to add any folders and programs in “My Computer” and “Control Panel

    You can add,change,remove program shortcut to run any application or mount any folder on your hard drive under my computer, you can also choose how do you want to open the folder you have mounted in my computer in a new window or in the same window.

    Application Shortcut In My Computer and Control Panel


    Folder2MyPc

    Mount Folder Shortcut In My Computer

    Mount-Folder

    You can edit or remove the mounted folder from my computer any time clicking the Edit / Remove tab in Folder2MyPc

    You can also customize the folder icon which you want to mount in my computer or control panel.

    Download Folder2MyPC

    How you can trace the Email Origin of the Sender

    Every email comes with headers that carry important information that can tell where the email was sent from and possibly who sent it.For that, you would need to find the IP address of the sender.Some  technical details require  to track the IP address of an email.

    The IP address is generally found in the headers enclosed between square brackets; for eg:[87.237.198.194]

    Finding IP address in GMail

    1. Log into your GMail  account and open the email , which one you want to know the IP Adress

    2. Click on the Reply link. Choose Show Original from the list.


    It will open a window like the following .Press Ctrl+F  to search ‘Received from’ or" ‘X-Originating-IP) .There may be  many “Received from” and those are IP addresses of all of servers involved in routing that email to you.

    image

    To find the first computer that originally sent the email, you’ll have to  select the last one.Here you can see IP address is 82.178.216.68

    Finding IP address in Yahoo Mail(Classic)

    1.Log into your account

    2.Usually Yahoo will not display headers in mails . Now you can enable this on the  bottom right hand corner of the page .

     image

    3.Click on Full Headers option,here also you can see IP address next to ‘Received’

    image

    Yahoo Mail Beta

    1.Log into your account

    2.At the top right, there is a drop-down option where Standard Header is selected by default,change it to Full Header

    image

    3.In a  different window , you’ll see the same information

    image

    Microsoft Outlook

    1.Open a message.

    2.On the Message tab, in the Options group, click the Dialog Box Laucher .

    In the Message Options dialog box, the headers appear in the Internet headers box.

    image

      A  dialog box  will popup and at the bottom you’ll see the Internet Headers Box.To view the IP address  clearly , you can  copy it in a Notepad.

    image

    Now How to Track the location of an IP address

    Once you got the IP address of the mail, with the help of the websites shown below you can locate the Country / State from which the email is sent.

    1. IP2Location

    2.GeoBytes IP Locator

    3.IP-address-locator

    4.Whois-lookup

    5.IP Address Finder

    6.Email Trace - Email Tracking Simply Copy and Paste below the email header of the message into the box provided  on this page to trace an email.


    for Example, take 1st one mohammed abdurahiman (kunchutty@hotmail.com)  send mail to Musheer (musheercmr@gmail.com). he used IP was 82.178.216.68

    go to IP2Location, and find the location.

    Mohammed Abdurahiman send this mail from OMAN.

    Keep your Desktop In your Flash Drive

    image In using computers everyday you likely send email, check the news, track finances. In using different computers you probably have different programs on each machine, maybe even different operating systems. Have you wished each machine had the same applications? Or that the bookmark you just added to your browser were on the other machine? Have you worried about computer viruses or your child deleting the wrong files? LivePCs can help you in each case.


    A LivePC is a virtual computer. You can run a different operating system and different
    applications within it than the computer normally runs. You can run this virtual computer directly
    on a computer or from a portable drive on most computers. LivePCs can be found in The Lab on
    MokaFive.com or you can make, and even share, your own using MokaFive Creator.

    Variety


    LivePCs are run from our MokaFive Player on Windows XP, Windows Vista, Intel based Mac OS X
    machines, or BareMetal. You can run many different LivePCs from the Player. Have an
    application you'd like to use that only works under DOS? You can have a DOS LivePC and add
    that application. Would you like to run some applications under Linux? Download a Linux LivePC.
    Would you like to have a safe games play space for your child? Launch a child friendly LivePC

    Offline Use


    LivePCs can be set for use without access to the internet. You could compose an email at the top
    of Mount Everest on your LivePC to send once you are again connected to the web.

    Security


    LivePCs run on your computer but they are copies of the ones maintained on our servers. The
    LivePC operating system and applications are kept separate from your personal data. If your
    LivePC gets a virus, it will be removed when you exit and re-launch the LivePC. The operating
    system and applications on a LivePC are kept clean by matching them to the LivePC in The Lab
    on MokaFive.com. LivePCs are also independent. They are not able to open or affect files in
    other LivePCs.

    Portability


    You can put LivePCs and the Player on a memory card, USB flash drive, USB hard disk, or an
    iPod and take them to another machine. You will be able to take your LivePCs between Intel
    based Macs and Windows XP or Vista machines. When installed using BareMetal you can run
    from a machine which allows you to boot from USB.

    Backups (Windows portable installation only)


    Your portable LivePCs and your personal data can be backed up automatically to a Windows XP
    or Vista computer. Should you lose your portable drive you can create a new one from the
    backup.

    Personalization


    You can also create and share your own LivePCs, either by modifying existing LivePCs or creating your own from scratch. You can then register your LivePC at MokaFive.com to share
    with the world or just your friends, or you can keep it private. By posting and subscribing to your
    own LivePC you can be assured that any spyware you pickup in your LivePC virtual computer will
    be removed the next time you launch it.

    Demo: http://www.mokafive.com/mokafive-demo.php

    Download: http://www.mokafive.com/solutions/player.php

    How To Avoid Win XP License Re-activation

    The time may come that you'll need to reinstall your Windows XP. It could happen. Maybe you'll add a new motherboard or hard drive. Maybe you'll get constant errors and problems that just won't go away. Or perhaps you're a neat freak who wants to rid yourself of clutter and start fresh with a clean operating system. If you do reinstall Windows XP, then you'll need to re-activate it too—that is, unless you keep this tip handy ;-)
    See, the first time you activated XP it created a file called "wpa.dbl" that lives in the WINDOWS\system32 folder. By creating a backup of this file on disk, you can simply put it back into the folder after reinstalling XP and avoid the whole re-activation hassle. Here's how...
    Go to My Computer then select your Hard Drive (usually drive C). Go to the WINDOWS\system32 folder and scroll way down until you find the wpa.dbl file.

    clip_image001

    Right-click and choose "Send To" then either Floppy Drive (make sure you have a disk in) or CD-R/RW.
    Now, when you reinstall Windows XP you'll come to the activation screen—decline to activate and let the install finish.
    Restart your computer in Safe Mode (keep hitting F8 at start-up then when the Advanced Boot Options menu appears arrow down to Safe Mode).
    Find your way back to the WINDOWS\system32 folder. It's a good idea to rename the wpa.dbl file you're replacing just in case you run into problems, so call it something like "wpa.nothing".
    Get the backup disk and copy the old wpa.dbl file back to the WINDOWS\system32 folder and reboot.
    There you go—XP is up and running again.

    P.S. Your wpa.dbl file might NOT work on another computer.

    Configure a VPN client with Windows XP

    If you want to configure a VPN connection from a Windows XP client computer you only need what comes with the Operating System itself, it's all built right in. To set up a connection to a VPN, do the following:

    1. On the computer that is running Windows XP, confirm that the connection to the Internet is correctly configured.
    • You can try to browse the internet
    • Ping a known host on the Internet, like yahoo.com, something that isn’t blocking ICMP
    1. Click Start, and then click Control Panel.

    1. In Control Panel, double click Network Connections

    1. Click Create a new connection in the Network Tasks task pad

    1. In the Network Connection Wizard, click Next.

    1. Click Connect to the network at my workplace, and then click Next.

    1. Click Virtual Private Network connection, and then click Next.
    2. If you are prompted, you need to select whether you will use a dialup connection or if you have a dedicated connection to the Internet either via Cable, DSL, T1, Satellite, etc.  Click Next.

    1. Type a host name, IP or any other description you would like to appear in the Network Connections area. You can change this later if you want. Click Next.

    1. Type the host name or the Internet Protocol (IP) address of the computer that you want to connect to, and then click Next.
    2. You may be asked if you want to use a Smart Card or not.

    1. You are just about done, the rest of the screens just verify your connection, click Next.

    1. Click to select the Add a shortcut to this connection to my desktop check box if you want one, if not, then leave it unchecked and click finish.
    2. You are now done making your connection, but by default, it may try to connect. You can either try the connection now if you know its valid, if not, then just close it down for now.

    1. In the Network Connections window, right-click the new connection and select properties. Let’s take a look at how you can customize this connection before it’s used.
    2. The first tab you will see if the General Tab. This only covers the name of the connection, which you can also rename from the Network Connection dialog box by right clicking the connection and selecting to rename it. You can also configure a First connect, which means that Windows can connect the public network (like the Internet) before starting to attempt the ‘VPN’ connection. This is a perfect example as to when you would have configured the dialup connection; this would have been the first thing that you would have to do. It's simple, you have to be connected to the Internet first before you can encrypt and send data over it. This setting makes sure that this is a reality for you.

    1. The next tab is the Options Tab. It is The Options tab has a lot you can configure in it. For one, you have the option to connect to a Windows Domain, if you select this check box (unchecked by default), then your VPN client will request Windows logon domain information while starting to work up the VPN connection. Also, you have options here for redialing. Redial attempts are configured here if you are using a dial up connection to get to the Internet. It is very handy to redial if the line is dropped as dropped lines are very common.

    1. The next tab is the Security Tab. This is where you would configure basic security for the VPN client. This is where you would set any advanced IPSec configurations other security protocols as well as requiring encryption and credentials. 

    1. The next tab is the Networking Tab. This is where you can select what networking items are used by this VPN connection.

    1. The Last tab is the Advanced Tab. This is where you can configure options for configuring a firewall, and/or sharing.

    Connecting to Corporate

    Now that you have your XP VPN client all set up and ready, the next step is to attempt a connection to the Remote Access or VPN server set up at the corporate office. To use the connection follow these simple steps. To open the client again, go back to the Network Connections dialog box.

    1. One you are in the Network Connection dialog box, double-click, or right click and select ‘Connect’ from the menu – this will initiate the connection to the corporate office.

    1. Type your user name and password, and then click Connect. Properties bring you back to what we just discussed in this article, all the global settings for the VPN client you are using.
    1. To disconnect from a VPN connection, right-click the icon for the connection, and then click “Disconnect”

     
    Copyright 2008 IToxy