Welcome to IToxy.com

Hi, Welcome to IT Oxy. This blog is primarily aim to share our information on Information Technology. I really appreciate if you are willing to give any input to this blog. If you want to share something, email at: admin@IToxy.com If you found any post interesting and useful, then please leave a comment and share with your friends.

Showing posts with label Registry. Show all posts

How to remotely enable Remote Desktop (RDP) in Windows XP/Vista/7/2008

Remote Desktop or RDP service is a free useful tool to remotely log on to remote computer and gain full access and privileges as if user is in front of local console. Remote Desktop is also known as Terminal Services. It’s useful if the server, or PC is located miles away in remote location, and frequent trip to the site to troubleshoot, configure or manage the system is not a viable option.

However, if an off-site server needs to be access via Remote Desktop Connection (RDC) client immediately, yet the Remote Desktop is not enabled on the server, then it will be a headache. Luckily it’s possible to remotely enable and turn of the Remote Desktop service on a remote PC or server by remotely editing its registry.

To remotely enable RDP on another computer, follow these steps:

  • Login to the workstation with administrator credentials.
  • Run Registry Editor (regedit).
  • Click on File menu.
  • Select the Connect Network Registry in the pull down menu.


  • A “Select Computer” dialog search box is opened. Type the host name of the remote computer in the text box, or browse Active Directory to locate the remote server, or click on “Advanced” button to search for the remote computer.

  • Click OK after the remote computer is selected. A node for the remote computer network registry will be displayed in the Registry Editor with HKEY_LOCAL_MACHINE (HKLM) and HKEY_USERS (HKU) hives.


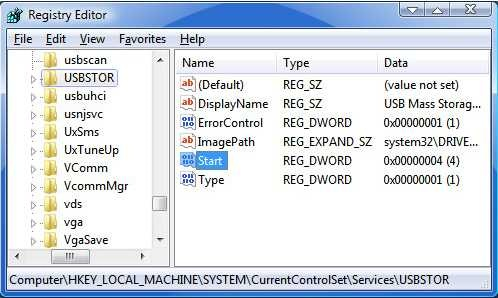
  • Navigate to the following registry key for the remote computer:

    HKEY_LOCAL_MACHINE\SYSTEM\CurrentControlSet\Control\Terminal Server


  • In the right pane, locate a REG_DWORD value named fDenyTSConnection. Double-click onfDenyTSConnection and change the value data from 1 (Remote Desktop disabled) to 0 (Remote Desktop enabled).

  • Reboot the remote machine by issuing the following command in Command Prompt:

shutdown -m \\Musheer-Laptop –r

  • Replace ‘Musheer-Laptop’ with the actual computer name of the remote host.

Remote Desktop for the remote computer has been enabled.

There are also plenty of freeware utility that allows user to remotely enable Remote Desktop without modifying registry, like IntelliAdmin, Acroni, etc…

വിന്‍ഡോസ്‌ 7 നില്‍ എങ്ങനെ OEM ലോഗോ ചേര്‍ക്കാം.

മാര്‍കറ്റില്‍ നിന്നും വാങ്ങുന്ന ഒട്ടുമിക്ക കമ്പനി ലാപ്ട്ടോപ്പിലും ഡെസ്ക്ടോപ്പിലും സിസ്റ്റം പ്രോപ്പെര്‍ട്ടി എടുത്തു നോക്കിയാല്‍ കമ്പനിയുടെ ലോഗോയും അട്രെസ്സും മറ്റു വിവരങ്ങളും നാം കണ്ടിരിക്കും. ഉദാഹരണത്തിന് താഴെ കാണുന്ന ചിത്രം കാണുക.

ഇങ്ങനെ കമ്പ്യൂട്ടറിന് നമ്മുടെ സ്വന്തം കമ്പനിയുടെ ലോഗോയും വിവരങ്ങളും എങ്ങനെ നല്‍കാം എന്നും നിലവിലുള്ള ലോഗോ എങ്ങനെ മാറ്റാം എന്നും നോക്കാം.

ആദ്യം ലോഗോ തയ്യാറാക്കുക. നിങ്ങള്‍ അപ്ഡേറ്റ് ചെയ്യാന്‍ ഉദ്ദേശിക്കുന്ന ലോഗോയുടെ വലുപ്പം 120 X 120 pixel ആക്കി മാറ്റുക. അതായതു 120 pixel വീതിയും 120 pixel ഉയരവും ഉള്ള ഒരു ഇമേജ് ആക്കുക. ശേഷം ഈ ഇമേജ് BMP (ബിറ്റ്മാപ് ഇമേജ് ഫയല്‍) ഫയല്‍ ഫോര്‍മാറ്റില്‍ ആക്കി OEMLogo.bmp എന്ന പേരില്‍ സേവ് ചെയ്തു വയ്ക്കുക. ഇതിനു ഫോട്ടോഷോപ്പ് പോലെയുള്ള ഏതെങ്കിലും ഇമേജ് എഡിറ്റിംഗ് സോഫ്റ്റ്‌വെയര്‍ ഉപയോഗിക്കാം.

ശേഷം സേവ് ചെയ്ത OEMLogo.bmp ഫയല്‍ വിന്‍ഡോസ്‌ > സിസ്റ്റം 32 ഫോള്‍ഡറിലേക്ക് കോപ്പി ചെയ്യുക.

ഉദാഹരണം: C:\Windows\System32\OEMLogo.bmp

ശേഷം കീബോര്‍ഡില്‍ വിന്‍ഡോസ്‌ + R ബട്ടണ്‍ പ്രസ്സ് ചെയ്തു റണ്‍ വിന്‍ഡോ എടുക്കുക. റണ്‍ വിന്‍ഡോയില്‍ REGEDIT എന്ന പദം ടൈപ്പ് ചെയ്തു എന്റര്‍ (ഓക്കേ) അടിക്കുക.


പിന്നെ കിട്ടുന്ന രജിസ്ട്രി എഡിറ്ററില്‍ താഴെ കാണുന്ന പാത്തിലേക്ക് പോയിന്റ്‌ ചെയ്യുക.

HKEY_LOCAL_MACHINE\SOFTWARE\Microsoft\Windows\CurrentVersion\OEMInformation

ശേഷം രജിസ്ട്രി എഡിറ്റര്‍ വിന്‍ഡോയില്‍ വലതു വശത്ത് കാണുന്ന ഭാഗത്ത്‌ മൗസിന്റെ റൈറ്റ് ബട്ടണ്‍ ക്ലിക്ക് ചെയ്യ്ത് പുതിയ സ്ട്രിംഗ് വാല്യൂ ആഡ് ചെയ്യുക.


വാല്യൂ നെയിം Logo എന്ന് ടൈപ്പ് ചെയ്ത ശേഷം ഡബിള്‍ ക്ലിക്ക് ചെയ്തു ലോഗോ സ്ട്രിംഗ് വാല്യൂ ഓപ്പണ്‍ ചെയ്യുക. ശേഷം വാല്യൂ ടാറ്റ ഫീല്‍ഡില്‍ നാം നേരത്തെ കോപ്പി ചെയ്ത OEMLogo.bmp യുടെ പാത്ത് നല്‍കുക. പാത്ത് നല്‍കുമ്പോള്‍ ഡ്രൈവ് ലെറ്റര്‍ ഉള്‍പ്പെടാതിരിക്കാന്‍ ശ്രദ്ധിക്കണം.

ശേഷം തഴെ കാണുന്ന സ്ട്രിംഗ് വാല്യൂ നെയിമുകള്‍ ഓരോന്നും ആവശ്യമെങ്കില്‍ ആഡ് ചെയ്യ്ത് മേല്‍ പറഞ്ഞ പോലെ വാല്യൂ നെയിമില്‍ ഡബിള്‍ ക്ലിക്ക് ചെയ്തു വാല്യൂ ടാറ്റ ഫീല്‍ഡില്‍  ടാറ്റ അപ്ഡേറ്റ് ചെയ്യുക.

    • Manufacturer
    • Model
    • SupportURL
    • SupportHours
    • SupportPhone

സ്ട്രിംഗ് വാല്യൂ വിന്റെ നെയിമില്‍ സ്പെല്ലിംഗ് തെറ്റിപ്പോയാല്‍ ആ സ്ട്രിംഗ് വാല്യൂ റീഡ് ചെയ്യുകയില്ല. മേല്‍ കാണുന്ന വാല്യൂ നെയിം അതേ പടി കോപ്പി ചെയ്യുക.

മേല്‍ പറഞ്ഞ എല്ലാ സ്ട്രിംഗ് വാല്യൂകളും ആഡ് ചെയ്തതിനു ശേഷം ഉള്ള രജിസ്ട്രി എഡിറ്ററിന്റെ ചിത്രം.

എല്ലാം അപ്ഡേറ്റ് ചെയ്ത് രജിസ്ട്രി എഡിറ്റര്‍ ക്ലോസ് ചെയ്ത ശേഷം സിസ്റ്റം പ്രോപ്പെര്‍ട്ടി എടുത്തു നോക്കിയാല്‍ നിങ്ങള്‍ മുമ്പ് നല്‍കിയ എല്ലാ വിവരവും ആ വിന്‍ഡോയില്‍ കാണാന്‍ സാധിക്കും.

OEM Logo Manager പോലെ യുള്ള സോഫ്റ്റ്‌വെയര്‍ മുഖേനയും ഇത് അപ്ഡേറ്റ് ചെയ്യാം. ഇത്തരം സോഫ്റ്റ്‌വെയറുകളില്‍ കൂടി അപ്ഡേറ്റ് ചെയ്യുമ്പോഴും ഇന്റെര്‍ണല്ലി രജിസ്ട്രിയില്‍ അപ്ഡേറ്റ് ചെയ്യല്‍ തന്നെ യാണ് നടക്കുന്നത്.


പോസ്റ്റ്‌ ഇഷ്ട്ടപ്പെട്ടെങ്കില്‍ ലൈക്‌ ചെയ്യാനും കമന്റിടാനും കൂട്ടുകാരുമായി ഷെയര്‍ ചെയ്യാനും മറക്കരുത്. Thumbs up

മൈക്രോസോഫ്ട്‌ ഔട്ട്‌ലുക്ക്‌ ഫോഴ്സ് ക്ലോസ്?

നമ്മില്‍ ഒട്ടു മിക്കവരും മൈക്രോസോഫ്ട്‌ ഔട്ട്‌ലുക്ക്‌ ഓഫീസ് / പേര്‍സണല്‍ ആവശ്യത്തിനായി ഉപയോഗിക്കുന്നവര്‍ ആണ്. അതില്‍ ഓഫീസ് ആവശ്യത്തിനായി മൈക്രോസോഫ്ട്‌ ഉപയോഗിക്കുന്നവര്‍ ആയിരിക്കും കൂടുതലും. ഔട്ട്‌ലുക്കില്‍ മൈക്രോസോഫ്ട്‌ എക്സ്ചേഞ്ച്, പോപ്‌-3, ഐമാപ് തുടങ്ങിയ ഇമെയില്‍ സര്‍വീസുകള്‍ ആയിരിക്കും ഉപയോഗിക്കുക.

ഈ സര്‍വീസുകള്‍ ഏതെങ്കിലും ഉപയോഗിക്കുമ്പോള്‍ നമ്മുടെ ഇമെയിലുകള്‍ എല്ലാം ലോക്കലി (C, D ഡ്രൈവുകളില്‍) ഒരു സ്ഥലത്ത് സ്റ്റോര്‍ ചെയ്യുന്നുണ്ടാവും. യൂസര്‍ പ്രൊഫൈലിലെ ലോക്കല്‍ സ്റ്റോറേജ് ഏരിയയില്‍ ആയിരിക്കും ഓട്ടോമാറ്റിക്കലി ഇത് സ്റ്റോര്‍ ചെയ്യുക. മൈക്രോസോഫ്ട്‌ എക്സ്ചേഞ്ച് ഉപയോഗിക്കുന്നവര്‍ ആണെങ്കില്‍  OST എന്ന ഫയല്‍ ഫോര്‍മാറ്റിലും പോപ്‌-3 തുടങ്ങിയ മറ്റു സര്‍വീസുകള്‍ ഉപയോഗിക്കുന്നവര്‍ ആണെങ്കില്‍  PST എന്ന ഫയല്‍ ഫോര്‍മാറ്റിലും ആയിരിക്കും ഇമെയിലുകള്‍ സ്റ്റോര്‍ ചെയ്യുക. മൈക്രോസോഫ്ട്‌ എക്സ്ചേഞ്ച് ഉപയോഗിക്കുന്നവരും തങ്ങളുടെ മെയില്‍ ബോക്സ്‌ ഫുള്‍ ആയാല്‍ പഴയ മെയിലുകള്‍ എല്ലാം ഡിലീറ്റ് ചെയ്യുകയോ ലോക്കലി ഏതെങ്കിലും സ്ഥലത്ത് (C, D ഡ്രൈവുകളില്‍) ആര്‍ക്കൈവ് ചെയ്തു വെക്കുകയോ വേണ്ടി വരും. ഇങ്ങനെ ആര്‍ക്കൈവ് ചെയ്തു വെക്കുന്ന ഫയലുകളും PST ഫയല്‍ ഫോര്‍മാറ്റിലും ആയിരിക്കും സ്റ്റോര്‍ ചെയ്യുക. ഈ ഫലയുകള്‍ ഒരു പക്ഷെ സൈസ് വളരെ കൂടിയതും ആവാം. ഇത്തരം PST ഫലയുകള്‍ ഉള്ള ഔട്ട്‌ലുക്ക്‌ ഉപയോഗിച്ച് ഔട്ട്‌ലുക്ക്‌ ക്ലോസ് ചെയ്ത് നാം കമ്പ്യൂട്ടര്‍ ലോഗോഫ്‌ ചെയ്യാനോ shutdown ചെയ്യാനോ മുതിരുമ്പോള്‍ ഒട്ടുമിക്ക കമ്പ്യൂട്ടറുകളിലും താഴെ കാണുന്ന  ഔട്ട്‌ലുക്ക്‌ ഫോഴ്സ് ക്ലോസ് മെസ്സേജുകള്‍ വരുന്നത് നമ്മില്‍ പലരും കണ്ടിരിക്കും.

Free Optimization Software For Windows 7

PC Brother System Care is an all-in-one software for Windows 7 that helps you protect and optimize Windows in a few steps.  The application packs-in various tools required to keep your system in top notch condition.

On the first run it will scan your system for performance related issues and suggests the areas that can be optimized to improve overall performance of your PC. Here are the key features of PC Brother System Care:

# Optimize – Speeds up PC quickly and easily by using one-click- optimize

# Security – Automatically detects  security risks and reminds users to solve them in time

# Tools- Managers autorun, running processes, services, network connections and more

# PC info – Displays system software and hardware details

There are some other features such has Hardware Management an Software Management that are available only in the paid version. So, you can only clean and optimize your PC with this free version.

The Network Optimization section looks pretty impressive as it offers you view and modify IP configuration, repair network, correct and restore connection, speedup network and manage system applications which are accessing network.

The only thing we didn’t like about this software is that it displays some false suggestions related to your Antivirus software. For instance, it might ask you to turn on Antivirus software even if the Antivirus software is running.

Download PC Brother System Care

A New Gmail Virus (Rememberthistime.rar) – Fixed!!

Since two days I was struggling with this virus, and now I found the fix for this, and now I’m able to run Firefox. So i want to share this steps are below  mentioned.

1) Run %temp% and delete all files.

2) Install NOD 32 latest version, and run the scan for Operating Memory and the Windows Installation Drive, after that better install Malwarebytes and run.

3) It should delete the C:\Windows\Pifex32.inf file (may be the filename might vary and I’m not sure about it, do comment). And if it does not, find out manually and delete it.

4) Basically the virus is attached to a service called services.exe (ironic!) and Mozilla Firefox doesn’t work even if  you run it with the explorer.exe ended.

5) Fire up the Firefox, and it should run normally (No need to reinstall if you haven’t done it already).

That is sufficient to bend the bug. For now I’m not having any recurring problem from that virus. So I feel I’ve fixed the issue. Share this with your friends so that they don’t start reinstalling their Firefox.


To Protect Yourself


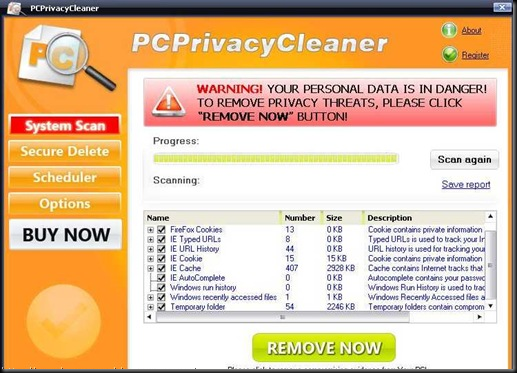
This Virus will auto sent from anyone in your contact list. If you find any of your friend’s mail with the following subject and body, and an attachment, simply hit delete.


Subject: hey

Body: I ran into some of your old friends the other day, they wanted me to send you this.

Attachment: rememberthistime.rar

NEVER EVER Open the attachment, as it is very unlikely for your antivirus to detect it, and as I happened to open it, I know what is inside the rar. It contains a rememberthistime.scr file, which has an icon of a monitor, and makes you feel it is a screensaver, and when you run it (which Idiotically I did) , nothing happens. But little Googling tells me that, mails will be sent from my mail to my contacts.

First Thing You need to do

1) Delete the mail that came in

2) Change your password to something totally different than the existing ones ( And better do this from some other machine )

Further reading

http://www.google.com/support/forum/p/gmail/thread?tid=6079efd2d0af6ab0&hl=en

Enable show hidden files and folders after Virus infected

Some virus or Trojans can hide themselves into a corner of the system, and sometimes it effectively force disable the “show all hidden files and folders” or “show all hidden files, folders and drives” option under the “folder options”. When it happens, hidden files, folders and drives on the PC do not been shown or displayed even though user has attempted to apply the settings to show the hidden files. The virus implements a policy such as “Shockwave.dll” that’s forcing system to keep hidden files forever not visible or hidden.

If your anti-virus or anti-malware solution is unable to get rid of the malware, and you’re very much needed to view the hidden files, here’s the workaround to enable system to show hidden files and folders again. There are many viruses that may cause the hidden files cannot be visible error, thus the following solution may not work on some system.

  • Go to Start Menu and click on Run (vista and Windows 7 uses Start Search instead).
  • Type regedit and press Enter to run
  • Navigate to the following registry key:

HKEY_LOCAL_MACHINE\SOFTWARE\Microsoft\Windows\
CurrentVersion\Explorer\Advanced\Folder\Hidden\SHOWALL

  • In the right pane, verify that the CheckedValue value data is REG_DWORD type. If it’s not (such as belongs to REG_SZ), then delete the CheckedValue value data.
  • If CheckedValue has been delete, create a new DWORD (32-bit) Value and name it as CheckedValue.
  • Double click on CheckedValue and change its value data to 1 (virus may change it to 0 or 2).
  • Within the same registry key, verify that the Type value data is of REG_SZ type, and has the value data radio. If not, set it to radio. Virus may change it to blank.
  • Set the system to reveal or show all hidden files, folder and drives, and then check if hidden files and folders are show.

How to ACTIVATE Windows XP without any software

This is a simple but effective registry hack.

1 – Start menu/run/ type “regedit” and press enter,
this will take you to the registry editor

2 – Now follow this directory:
HKEY_LOCAL_MACHINE/Software/Microsoft/WindowsNT/CurrentVersion/WPAEvents

3 – When you get to WPAEvents in the righthand column there should be “OOBETimer”
right click it and go to “modify”
Change the numbers in there to :

FF D5 71 D6 8B 6A 8D 6F d5 33 93 FD (this works with Windows XP Home and Pro, both 32 and 64bit versions)

4 – When you’ve entered them, right click on the file “WPAEvents” and go into “permissions”

5 – In there highlight “SYSTEM” and underneath it check the two boxes under “deny” and click “OK”

Phew thats it!!! I know it looks complicated but it’s really easy, it just requires patience.

I tried this when I used up the amount of times you can activate Windows XP, it worked a treat!

To check that Windows is activated, simply click on Start menu/All Programs/Activate Windows.

It will say “Windows is already activated”.

image

Change Your Windows Registration Name

If you bought a previously owned computer, there is a good chance that Windows still says it is registered to its former owner.To remove that name and insert your own, you must edit the Windows Registry:

1. Click the Start button in the lower-left corner of Windows.
2. Click Run.
3. A window will appear.Type regedit in the blank, and then click the OK button or press the Enter key.
4. The Windows Registry Editor opens. In the left window pane, double click the HKEY_LOCAL_MACHINE registry key. If you can’t find it, do the following

    a. In the left window pane of the Registry Editor, scroll to the top.
    b. If any of the HKEY registry keys are open—as indicated by a minus sign (-) on their left side—then close them by clicking that minus sign. When a registry key has been properly closed, it will have a plus sign (+) next to it.
    c. Repeat this process for the remaining HKEY registry keys until the only things visible in the left window pane are the five HKEY keys
    d. Double-click the HKEY_LOCAL_MACHINE registry key.

5. A new column of registry keys appears. Double-click Software.
6. A long column of registry keys will appear. Scroll down until you find Microsoft, and then double-click it.
7. Another long list of registry keys appears. Scroll down and double click Windows NT.
8. Click the CurrentVersion registry key.
9. In the right window pane, double-click the RegisteredOwner registry value

image

10. A window opens. Under the Value Data heading is the name of the previous owner. Delete it, and then type your name in the blank.
11. Click the OK button.
12. Above RegisteredOwner, double-click the registry value named RegisteredOrganization

13. Under the Value Data heading is the name of the previous owner’s employer or organization. Delete it, and then type the name of your organization (or you can just leave it blank if you want).
14. Click the OK button.
15. Exit the Registry Editor by clicking the X button in the upper-right corner.

How can I clear the Run history?

Whenever we type a command in run prompt you might have noticed that the programs that you run remain the in the drop down menu as history.It may be annoying at times, especially when you have multiple users who use the same PC.

image

There few methods to clear the windows run history.

Method-1

1. Download MRU Blaster

2. Install  and Run

3. Click the Scan button and then click the Clean Now button to clear the windows run history.

4. Exit MRU Blaster.

image

image

Method-2

1. Go to Start> Run, type regedit and hit Enter
2. Navigate to the following path:

HKEY_CURRENT_USER\Software\Microsoft\Windows\CurrentVersion\ Explorer\RunMRU\

3. You will see various registry key values in the right pane, as there are in the snapshot shown below

4. Double click the key MRUList and delete everything in the value data box(everything in the right pane, except for (Default)).

image

“Show Hidden Files and Folders” not Working ?

Do you encounter problems like when you go to Windows Explorer, Tools Menu--->Folder Options--->View Tab--->Hidden Files and Folders--->"Show hidden Files and Folders"and you would like to view hidden files and folders but after applying, it will not actually show the hidden files and folders, and even when you tried it all over, it will just come back.


It was probably some virus attack after which the Windows registry was not being updated properly.There are so many methods to restore back the registry.If one method is not working, you can  try another one.

Method-1

Go to registry editor by running regedit in the run box.
Go to this key:

HKEY_CURRENT_USER\Software\Microsoft\Windows\CurrentVersion\Explorer\Advanced\Hidden

In the right hand area, double click hidden and change the value to 1.

Now you’re all set to go. Check it in your tools menu if the changes have taken effect

Method-2

1. Click “Start” -> “Run…” (or press Windows key + R)
2. Type “regedit” and click “Ok”.
3.Find the key:

HKEY_LOCAL_MACHINE\SOFTWARE\Microsoft\Windows\CurrentVersion\Explorer\Advanced\Folder\Hidden\SHOWALL

4. Look at the “CheckedValue” key. This should be a DWORD key. If it isn’t, delete the key.
5. Create a new key called “CheckedValue” as a DWORD (hexadecimal) with a value of “1”.

6.Also look for key that says “DefaultValue” and change its value to “2
7. The “Show hidden files & folders” check box should now work normally

image

Method-3

Download this Reg key, Unzip it > Right Click on "fix.reg" > Choose "MERGE"
Now try Unhiding your Hidden Files

Method-4
Open command prompt and execute this command---> regsvr32 /i shell32.dll.That will return the Default Local Machine entries which may have been changed back to their individual defaults so that when you select not to hide files, they are shown etc.Then you can go into folder options and reset your options.Some malware is using this ploy too, like infected flash drives. so it is recommended that every time you insert a flash disk scan it first.

How to Disable Use of USB Storage Devices in Windows?

image

What happens if the users bring their own USB memory sticks and connect them to the computers at their office?With the size of USB storage devices increasing so much in recent years, the risk is increasing as more and more data could possibly be stolen or lost accidentally.

You can restrict access for installing new USB storage devices by changing the permissions of these files:

Type %windir%\inf in Explorer address bar or RUN dialog box and press Enter. It’ll open “inf” folder.

  • %SystemRoot%\Inf\Usbstor.pnf
  • %SystemRoot%\Inf\Usbstor.inf

To assign a user or group Deny permissions to the Usbstor.pnf and Usbstor.inf files, follow these steps:

  • Start Windows Explorer, and then locate the %SystemRoot%\Inf folder.
  • Right-click the Usbstor.pnf file, and then click Properties.
  • Click the Security tab.
  • In the Group or user names list, click the user or group that you want to set Deny permissions for.
  • In the Permissions for UserName or GroupName list, click to select the Deny check box next to Full Control, and then click OK.
    Note In addition, add the System account to the Deny list.
  • Right-click the Usbstor.inf file, and then click Properties.
  • Click the Security tab.
  • In the Group or user names list, click the user or group that you want to set Deny permissions for.
  • In the Permissions for UserName or GroupName list, click to select the Deny check box next to Full Control, and then click OK.

image

You can disable USB storage access for a certain group of users this disabling and re-enablement of USB ports is based on a simple registry entry

If a USB storage device is already installed on the computer, set the Start value in the following registry key to 4:

HKEY_LOCAL_MACHINE\SYSTEM\CurrentControlSet\Services\UsbStor

When you do so, the USB storage device does not work when the user connects the device to the computer. To set the Start value, follow these steps:

  • Click Start, and then click Run.
  • In the Open box, type regedit, and then click OK.
  • Locate, and then click the following registry key: HKEY_LOCAL_MACHINE\SYSTEM\CurrentControlSet\Services\UsbStor
  • In the right pane, double-click Start.
  • In the Value data box, type 4, click Hexadecimal (if it is not already selected), and then click OK.
  • Quit Registry Editor

image

To setup read only USB storage device operation, follow these steps below:

1. Click on the Start Button and type in Regedit and hit Enter.
2. Navigate through HKEY_LOCAL_MACHINE\SYSTEM\CurrentControlSet\Control.
3. Right click on Control and select New and then Key. Call the new key StorageDevicePolicies.
4. Right click on StorageDevicePolicies and select New and then Dword. Call the new dword WriteProtect.
5. Right click on WriteProtect and select Properties. Set the value to 1 and hit OK.
The computer is now configured to disable writing to USB storage devices.

Free tool - http://www.intelliadmin.com/blog/2007/01/disable-usb-flash-drives.html (two versions: local and remote)

To re-enable USB storage devices, you will need to restore the original permissions. From Windows 2000, or Windows XP  in Safe Mode:

  1. Click Start and then Run... and type %systemroot%\inf
  2. Look for usbstor.inf, right-click on it and click Properties.
  3. Click the Security tab, remove "SYSTEM" from the list.
  4. Click "Advanced..." and turn on "Allow inheritable permissions..." Click OK to save the change and OK again to close the Properties window.
  5. Repeat for usbstor.pnf.

Software wroth to try : Windows Network USB Drive Blocker 2.0.1.5

Removal of PC Privacy Cleaner

PC Privacy Cleaner is a fake registry cleaner tool, which pretends to be able to clean your registry.PCPrivacyCleaner may spread with trojans, or you can get duped into downloading PCPrivacyCleaner from PCPrivacyCleaner.com. Once you’ve got PCPrivacyCleaner, it pops up annoying messages and runs fake scans.

Symptoms

  • "Critical System Error",
  • "Your computer is infected",
  • Hijacked homepage to obscure webpage.
  • Flashing icons appear on your system tray (Near of your system clock).

    Manual Removal Steps

    1.Press Ctrl+Alt+Del to open Task Manager,check any process like pcpc.exe/PCPC_Setup_Free.exe running,kill that process

    2.Open C:\Program Files (assuming windows installed in C drive) and delete the folder named PCPrivacyCleaner or To find PCPrivacyCleaner directories, go to Start > My Computer > Local Disk (C:) > Program Files > Show the contents of this folder.Search and delete the following PCPrivacyCleaner directories:
    C:\ProgramFiles\pcprivacycleaner
    %common_programs%\pcprivacycleaner
    %program_files%\pcprivacycleaner

    3.Remove  PC Privacy Cleaner  short cuts from desktop, start menu and quick launch.Empty Recycle Bin

    4.If PCPrivacyCleaner changed your homepage?Start menu > Control Panel > Internet Options. Next, under Home Page, select the General > Use Default. Type in the URL you want as your home page (e.g., “http://www.google.com”). Then select Apply > OK. You’ll want to open a fresh web page and make sure that your new default home page pops up.

    5.How to remove PCPrivacyCleaner registry keys?

    Start->Run-> type regedit and press enter.Remove following entries

    HKEY_CURRENT_USER\software\pcprivacycleaner
    HKEY_CURRENT_USER\software\pcprivacycleaner activationcode
    HKEY_CURRENT_USER\software\pcprivacycleaner cookieparams
    HKEY_CURRENT_USER\software\pcprivacycleaner installdate
    HKEY_CURRENT_USER\software\pcprivacycleaner lastscantime
    HKEY_CURRENT_USER\software\pcprivacycleaner totalscancount
    HKEY_CURRENT_USER\software\pcprivacycleaner\schedule
    HKEY_LOCAL_MACHINE\software\microsoft\windows\currentversion\run pcprivacycleaner                                                                                                 HKEY_LOCAL_MACHINE\SOFTWARE\Classes\CLSID\{70d17a5f-ef27-4295-90f5-20ad6f24834f}
    HKEY_LOCAL_MACHINE\SOFTWARE\Classes\CLSID\{80ced3d6-ece9-48ba-8df8-2503d8d87c2b}
    HKEY_LOCAL_MACHINE\SOFTWARE\Classes\CLSID\{aa6d4f53-4c8d-4549-84d2-02d584acc4e9}

    6.How to remove PCPrivacyCleaner DLL files

    To locate the PCPrivacyCleaner DLL path, go to Start > Search > All Files or Folders. Type PCPrivacyCleaner and in the Look in: select either My Computer or Local Hard Drives. Click the Search button.

    Once you have the PCPrivacyCleaner DLL path,Start->Run->type cmd and click “OK.” To change your current directory, type “cd” in the command box, press your “Space” key, and enter the full directory where the PCPrivacyCleaner DLL file is located. (If you’re not sure if the PCPrivacyCleaner DLL file is located in a particular directory, enter “dir” in the command box to display a directory’s contents. To go one directory back, enter “cd ..” in the command box and press “Enter.”)

    Here you type regsvr32 /u [dll_name] and press enter to unregister the DLL.If you accidentally do something wrong, you can register it again by using regsvr32 [dll_name].eg:regsvr32 /u pcpc.dll  .(How to register/unregister a .dll file)

    PCPrivacyCleaner Automatic Removal Instructions

    Print these instructions because you’ll have to reboot into Safe Mode. Also back up your computer in case you make a mistake

    1. Download and save SmitFraudFix to your desktop.

    2. Restart your computer in Safe ModeOnce thedesktop appears, double click on the SmitfraudFix.exe on your desktop.

    3. After the credits screen, you’ll see a menu. Select the option number 2, which is ‘Clean (safe mode recommended)’, and thenpress Enter to delete infect files.

    4. SmitFraudFix will begin cleaning your computer and take a series of cleanup processes. When the process is over, it will automatically begin the Disk Cleanup program.

    5. Once the Disk Cleanup program is complete, you will be prompted with the message ‘Registry cleaning - Do you want to clean the registry’. Answer Y (Yes) and hit Enter. Reboot your computer.

    6. SmitFraudFix will now check if wininet.dll is infected. SmitFraudFix will ask you whether to replace the infected file (if there’s any) ‘Replace infected
      file?’
      Answer by typing Y (Yes) and hit Enter.

    7. Reboot your computer to complete the cleaning process.

    8. After reboot, a Notepad screen may appear containing a log of all the filesremoved from your computer. If it doesn’t appear, a file will be created called rapport.txt in the root of your drive, (Local Disk C:).

    9. Restart your computer in Safe Mode .

    10. Go to C:\Windows\Temp, click Edit, click Select All, press DELETE, and thenclick Yes to confirm that you want all the items to go to the Recycle Bin.

    11. Go to C:\Documents and Settings\[LISTED USER]\Local Settings\Temp, click Edit, click Select All, press DELETE, and then click Yes to confirm that
      you want all the items to go to the Recycle Bin.

    12. Reboot your computer back to normal mode.

    How to use  SmitfraudFix ,detailed instructions here

  • How to hide computer drives to secure data?

    This tip is very useful for home users, particularly for those who wants to hide/secure there important data from other users. You can hide any specific local drive or all drives (physical and removable) of the system and network drives also. By disabling the display of drives, you can safe your personal data from non-technical users on a single computer.

    Follow the given steps to change the system drives registry value:

    • To use this feature, you will need to be logged into your computer with

    administrative rights.

    • Click Start button and type regedit in Run option then press Enter for next.

    • Here locate the location to:

    · HKEY_CURRENT_USER\Software\Microsoft\Windows\CurrentVersion \Policies\Explorer

    · Here in right side panel, right click to create a new DWORD value

    with name NoDrives (it is case sensitive), then assign number

    to its value data box.

    · Now if you want to hide all system drives then modify value data

    to 3FFFFFF .

    · For specific drive use values (For example, for A, B, C, D, E, F, G,

    H drives, the values are 1, 2, 4, 8, 16, 32, 64, and 128 respectively).

    · In this case we are trying to hide F drive, so we modify the value data

    box to 32.

    · Now close the registry editor and restart your computer after any

    changes to go into effect.

    · But next time, if you want to unhide this drive then simply change

    the value data box or delete the DWORD item.

    • Again close the registry editor and restart your computer after any

    changes to go into effect.

    How to login with multiple ID's at the same time in Yahoo messenger?

    If you have multiple yahoo ID's and wants to login with more than one yahoo ID at the same time then don't worry, you can login with more than one yahoo ID at the same time using this tip. There is no need to install any other yahoo multi messenger version, you can easily covert your normal yahoo messenger into multi messenger and enjoy your many ID's at the same time.

    Follow the given steps to change the yahoo messenger registry value:

    • Click Start button and type regedit in Run option then press Enter for next.

    • Here locate the location to:
    • Here in right side panel, right click to create a new Dword value with name Plural and give it value 1.
  • Now close the registry editor and restart your computer after any changes to go into effect.

  • For signing in with new YAHOO ID open another messenger open as many messengers you need.
  • If you want to disable the multiple messenger option then again open registry editor and change Plural value 1 to 0.
  •  
    Copyright 2008 IToxy