Welcome to IToxy.com

Hi, Welcome to IT Oxy. This blog is primarily aim to share our information on Information Technology. I really appreciate if you are willing to give any input to this blog. If you want to share something, email at: admin@IToxy.com If you found any post interesting and useful, then please leave a comment and share with your friends.

Showing posts with label Outlook. Show all posts

മൈക്രോസോഫ്ട്‌ ഔട്ട്‌ലുക്ക്‌ ഫോഴ്സ് ക്ലോസ്?

നമ്മില്‍ ഒട്ടു മിക്കവരും മൈക്രോസോഫ്ട്‌ ഔട്ട്‌ലുക്ക്‌ ഓഫീസ് / പേര്‍സണല്‍ ആവശ്യത്തിനായി ഉപയോഗിക്കുന്നവര്‍ ആണ്. അതില്‍ ഓഫീസ് ആവശ്യത്തിനായി മൈക്രോസോഫ്ട്‌ ഉപയോഗിക്കുന്നവര്‍ ആയിരിക്കും കൂടുതലും. ഔട്ട്‌ലുക്കില്‍ മൈക്രോസോഫ്ട്‌ എക്സ്ചേഞ്ച്, പോപ്‌-3, ഐമാപ് തുടങ്ങിയ ഇമെയില്‍ സര്‍വീസുകള്‍ ആയിരിക്കും ഉപയോഗിക്കുക.

ഈ സര്‍വീസുകള്‍ ഏതെങ്കിലും ഉപയോഗിക്കുമ്പോള്‍ നമ്മുടെ ഇമെയിലുകള്‍ എല്ലാം ലോക്കലി (C, D ഡ്രൈവുകളില്‍) ഒരു സ്ഥലത്ത് സ്റ്റോര്‍ ചെയ്യുന്നുണ്ടാവും. യൂസര്‍ പ്രൊഫൈലിലെ ലോക്കല്‍ സ്റ്റോറേജ് ഏരിയയില്‍ ആയിരിക്കും ഓട്ടോമാറ്റിക്കലി ഇത് സ്റ്റോര്‍ ചെയ്യുക. മൈക്രോസോഫ്ട്‌ എക്സ്ചേഞ്ച് ഉപയോഗിക്കുന്നവര്‍ ആണെങ്കില്‍  OST എന്ന ഫയല്‍ ഫോര്‍മാറ്റിലും പോപ്‌-3 തുടങ്ങിയ മറ്റു സര്‍വീസുകള്‍ ഉപയോഗിക്കുന്നവര്‍ ആണെങ്കില്‍  PST എന്ന ഫയല്‍ ഫോര്‍മാറ്റിലും ആയിരിക്കും ഇമെയിലുകള്‍ സ്റ്റോര്‍ ചെയ്യുക. മൈക്രോസോഫ്ട്‌ എക്സ്ചേഞ്ച് ഉപയോഗിക്കുന്നവരും തങ്ങളുടെ മെയില്‍ ബോക്സ്‌ ഫുള്‍ ആയാല്‍ പഴയ മെയിലുകള്‍ എല്ലാം ഡിലീറ്റ് ചെയ്യുകയോ ലോക്കലി ഏതെങ്കിലും സ്ഥലത്ത് (C, D ഡ്രൈവുകളില്‍) ആര്‍ക്കൈവ് ചെയ്തു വെക്കുകയോ വേണ്ടി വരും. ഇങ്ങനെ ആര്‍ക്കൈവ് ചെയ്തു വെക്കുന്ന ഫയലുകളും PST ഫയല്‍ ഫോര്‍മാറ്റിലും ആയിരിക്കും സ്റ്റോര്‍ ചെയ്യുക. ഈ ഫലയുകള്‍ ഒരു പക്ഷെ സൈസ് വളരെ കൂടിയതും ആവാം. ഇത്തരം PST ഫലയുകള്‍ ഉള്ള ഔട്ട്‌ലുക്ക്‌ ഉപയോഗിച്ച് ഔട്ട്‌ലുക്ക്‌ ക്ലോസ് ചെയ്ത് നാം കമ്പ്യൂട്ടര്‍ ലോഗോഫ്‌ ചെയ്യാനോ shutdown ചെയ്യാനോ മുതിരുമ്പോള്‍ ഒട്ടുമിക്ക കമ്പ്യൂട്ടറുകളിലും താഴെ കാണുന്ന  ഔട്ട്‌ലുക്ക്‌ ഫോഴ്സ് ക്ലോസ് മെസ്സേജുകള്‍ വരുന്നത് നമ്മില്‍ പലരും കണ്ടിരിക്കും.

Sync your Outlook Calendar with Google Calendar

Google Calendar Sync allows you to sync events between Google Calendar and Microsoft Outlook Calendar. You'll be able to determine the direction of information flow, as well as the sync frequency. Staying on top of your Google Calendar and Microsoft Outlook Calendar events has never been easier! Here's some good information to know to help you get started with Google Calendar Sync.

Currently, Google Calendar Sync is only compatible with Microsoft Outlook versions 2003 and 2007, and operating systems Windows XP and Windows Vista.

To set up Google Calendar Sync:

  1. Download Google Calendar Sync (version 0.9.3.5) at http://dl.google.com/googlecalendarsync/GoogleCalendarSync_Installer.exe
  2. Once a dialog box appears, click Save File. The downloaded file should open automatically. If it doesn't, manually open it from your browser's download window.
  3. Click OK to confirm that you're aware this is an executable file.
  4. Read through the Google Calendar Sync Terms of Service, and click I Agree.
  5. Follow through the Installation Options and click Install to finish the set-up process.


Once Google Calendar Sync is installed on your computer, the Google Calendar Sync Settings window will appear:

In the Settings window, enter your email address and password and select the Sync Option you prefer. Read about each Sync Option.

You'll also be able to set the time interval for syncing to occur. Please keep in mind that 10 minutes is the minimum time interval allowed.

After the initial set-up, you can access the Google Calendar Sync Settings window again by double-clicking the calendar icon in your Windows System Tray.

Icon Status

To access the Google Calendar Sync Settings window, just right-click the calendar icon in your Windows System Tray and select Options.

When your events are actively syncing between Google Calendar and Microsoft Outlook Calendar, you'll see arrows in the Google Calendar Sync icon:

When events aren't actively syncing, your calendar icon will look like this:

Shutdown/Restart your computer by an SMS or Email

Shutdown or restart your computer by just an SMS or send an Email from any email ID.

In some situation this trick would help you to shutdown/restart your computer remotely, say for you forgot to shutdown your computer or any of your application just gone to hanged and you are not there, your company people are nagging you over phone and they really don’t know how to play around, in that case the final option is restart and you do not want to inform your company:)

Ok, I will break it, You need MS office outlook( I just tried with MS office outlook 2003, so you can select what ever you want), smsEmail gateway number and a batch file

Here we go,you need to create separate batch files for shutdown the machine and for restart the machine.

The code for shutdown:-

C:\windows\system32\shutdown -s -f -t 00

type this code into a notepad and save as shutdown.bat (check your file extensions are enabled, otherwise it will save as txt format)

Just note, save the destination at somewhere which you do not use usually, otherwise if you click on the  bat file by chance, it will go to crazy

follow the same method for create a restart batch file and name it as restart.bat, the code for restart:-

C:\windows\system32\shutdown -r -f -t 00

The next step  is configure your outlook, if you want to configure  Gmail on your outlook follow this link:- http://support.email2pop.com/Gmail_Outlook.html

Then finally here is our deal,

First we go for shutdown option by sending an Email from  any Email account :-

Open your outlook, go to tools-Rules and alerts-press create new rule-start from a blank rule-press next. will get lot of options. Here you have to bit careful,

You can find there with specific word in the subject(check the enable box), in the down you can see specific word, there specify which word you want to use for shutdown your computer (you will get another popup and type which word you want, eg:- shutdown my computer now), then press next, scroll down, you can find start application( check the enable box), in the down you can see start application option, click the start application then select  the appropriate saved batch file which you created before( in this case shutdown.bat). press finish.

How we can test that  is this working? Go to any of your email account, sent an email to your outlook id with the exact subject(shutdown my computer now). once it received to your outlook the rule will generate and the application will run.Before that you need to do one more thing, enable the auto send/receive option, in that it will receive the email automatically, otherwise you cannot perform this trick remotely. Just go to tools-mail setup- press send/receive- will get another popup- do the same like as in the below  picture


For restart :-

Do the same like as the shutdown procedure, but you must careful about the specific subject word and application.

Give the word as something restart my computer now and after choose the correct application which you created early ( restart.bat)

then test it.

Finally, How we can work out this method by an sms?

For shutdown:-

You need to create again rules same like as what you did early. For shutdown, the subject should be like SMS from Mobile: +97150xxxx (add your number instead of the xxx) then follow same procedures for shutdown.

You need to find out the email gateway number for sending emails from your mobile.its quite simple to  find out a emailgateway number. I found one from  google, which i will give now  +6591653870

go to your text message, create new  and To number is +6591653870 ,  body as the email id which you selected for the rules, space then type something…the subject it will select automatically as SMS from Mobile: +97150xxxx (instead the xx your number will appear whe the email receive).

for more detail about the smsemail gateway check this :  http://www.visualtron.com/sms2email.htm

For restart:-

you need to create the rules again, when you create the outlook rule select the specific words in the senders address(just scroll down, there you can find this) click in the down for specify the word and type this word there: VisualGSM SMS2Email Server [support@visualtron.com]

There are many other sms_email gateways, you can use those also. if you select any other, just sent a test mail to your outlook account and check what subject and sender id  you received. Then you need to edit or create a new rule for it…

Don’t think it is complicated, it’s very easy to do…

Note :- your outlook should be always open/turned on  for work this trick, if you close your outlook then the rules can’t work out.

if you have any questions, don’t hesitate to contact me

Embed Image in email (Gmail, Yahoo, Outlook)

Gmail


Gmail Labs offers embedding images into emails.You can upload the files which  appear as small thumbnails. Once you select the required image you have the option to resize them within your email message to thumbnail, medium, large and original dimensions.This feature that can be found in Gmail Labs (under “Settings” -> “Labs”).


In order to insert an image you'll have to have "rich formatting" turned on. Once it is, you should notice an image icon squeezed between the emoticon and link icons. Click it and you can upload an image to post in the body of your message. That's it.

Gmail doesn't show URL-based images in messages by default to protect you from spammers, so if you're sending mail to other Gmail users, they'll still have to click "Display images below" or "Always display images from ..." to see images you embed.

  Yahoo


Open your Yahoo Mail and ensure  rich text formatting  is enabled in Options  ,

  • Options > Mail Options >Click General>Under Mode make sure Compose messages as color and graphics is selected.
  • Click Save

    Now you have to upload the images from your PC  to anyone of the free image hosting sites.There are many available in net,try a Google check:http://tinyurl.com/qnho82 .Here I am using Photobucket.After uploading your image,just copy it.For that highlight the image with mouse , right click & select copy( Ctrl+C)

    If your image is larger than some 640x640 pixels, consider shrinking it to more handy proportions before you put it online.
    To trim images to be lean and fit for emails use  ResizR. -ResizR is a  free and very useful little utility. ResizR allows you to resize an image from your local computer or the web.Click Browse and select the desired image. Use the slider or the entry field to choose the desired width. Use a width between 300 and 640 pixels.Try 340 pixels first.  Click ResizR.
    Drag and drop the resulting image to your Desktop. Another free utility is VSO Image Resizer.Alternatively you can  use tools  like  Image Resizer PowerToy | IrfanView

    Now paste  this image to your yahoo mail .You can  add more images like this way.Finally, send your Yahoo! Mail message as usual

    If you are using other mail clients like Outlook/Outlook Express, it is easy for you to add images as inline.But  if you don't have Yahoo Plus account, you need to configure your yahoo mail with YPOPs! Download YPOPs! from here http://ypopsemail.com/ .How to configure it in Outlook Express  here  and  in Outlook   here . If you have a  Yahoo Singapore or    Yahoo Hong Kong  ,you can configure Yahoo Mail  in Outlook/Outlook Express .These are providing Free Yahoo POP3 email account.

  •  

    Outlook


    Open new mail message >Insert >Picture .Select your  pictures  from your PC as shown below

    Send your messages as usual.

    Microsoft Office 2007 SP2 Released

    Microsoft released Office Service Pack 2, which improves the performance of Microsoft Outlook and adds support for Open Document Format in Word, Excel and PowerPoint  2007.Slow IMAP access of Outlook fixed in this release,which is a good news for users  who check their Gmail emails on Outlook via IMAP.Outlook downloads newest mail first instead of oldest mail is another  change for POP3 access.Here’s a complete list of changes and issues that have been fixed through Service Pack 2

    Features

    • Support for Open Document Format (ODF)
    • Support for XML Paper Specification (XPS),
    • Support for  Portable Document Format (PDF)

    image

    For Office Desktop Programs:

    • Improved Outlook Calendaring Reliability
    • Improved Outlook Performance
    • Enabling Object Model support for Charts in PowerPoint and Word
    • Improved cryptographic functionality by supporting all cryptographic algorithms offered by the operating system
    • Improved functionality in Excel’s charting mechanism
    • Ability to ungroup SmartArt graphics (and as a result, the ability to add animations to them in PowerPoint)
    • Ability for Visio to export UML models to an XML file compliant with the XMI standard
    • Tool that enables the uninstall of Office client Service Packs

    For Servers:

    • Performance and manageability improvements to variations in Enterprise Content Management (ECM) including STSADM commands for repairing links between source and target pages
    • Improvements around processing status approvals from Office Project Web Access into Office Project Professional 2007
    • Improvements to read-only content databases and index rebuild timer jobs in Windows SharePoint Services 3.0

    More  here http://support.microsoft.com/kb/953195 | Download | 290 MB|Free

    Alternatively you can install this update from Microsoft Update

    Google Email Uploader

    The Google Email Uploader is a desktop utility for Microsoft Windows that uploads email and contacts from other desktop email programs (like Microsoft Outlook) into your Google Apps mailbox. The Email Uploader preserves information such as sent dates and sender/recipient data, as well as the folder structure used by the other email program. The Google Email Uploader requires a Google Apps account.
    The Email Uploader is Apache 2.0 licensed open source software, and is governed by the terms of the included license file. This means you may modify the tool to better suit your needs


    Gmail Account in Outlook

    If you have an Gmail account you have almost 3 gigabytes space on their servers and some people use that space as storage for their messages. But you can also have access to Gmail through Outlook, too if you like. In that case you can write mails and answers using Outlook advantages. You can use Stationery and other possibilities. To start with that, you have to do following:

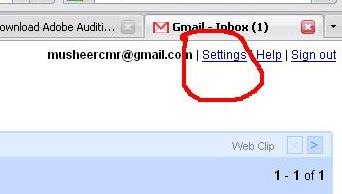
    1. Login to your Gmail Account.

    2. Go to Settings.

     0001

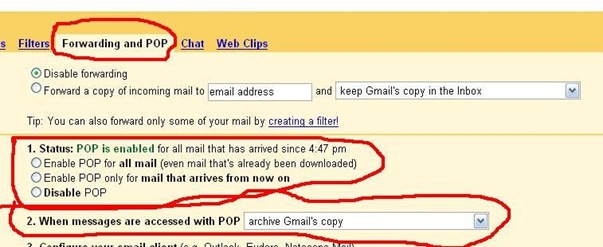
    3. Choose Forwarding and POP tab

    4. Choose Enable POP and click on Save Changes button.

    5. Choose Archive Gmail’s Copy. This selection safe. So your all mail safe in your Gmail All Mail folder. If u no need received mails, you can delete from All Mails folder weekly or monthly.0002

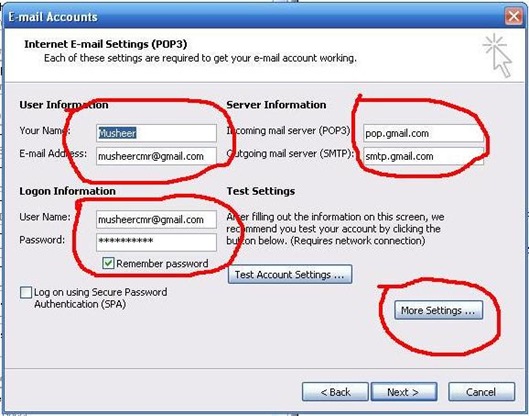
    6. Go to Outlook 2003 or 2007 or outlook express Tools menu > Account Settings > Create new Account >

    7. Type Your name > Type Email Address > POP3= pop.gmail.com > SMTP= smtp.gmail.com > Username  with @gmail.com > Password > if you want save password click selection. 0003

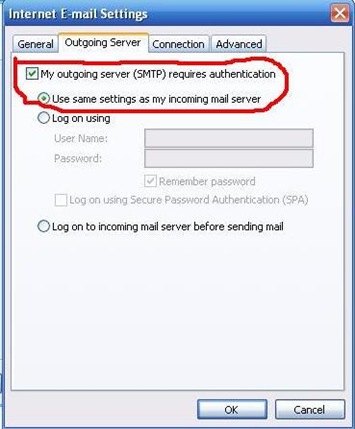
    8. Go to More settings > Choose Outgoing server tab > Tick on My outgoing server (SMTP) requires authentication > Make sure Selection is Use same settings as my incoming mail server >

    0004

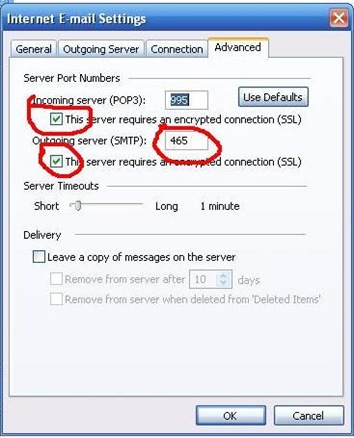
    9. Go to Advanced tab > Tick on This sever requires an encrypted selection (SSL) of the incoming server (POP3) > Make sure port 995.

    10. Tick on This sever requires an encrypted selection (SSL) of the incoming server (SMTP) > Change port to 465 > Ok > Next > Finish > (if u want test account settings , you can.)

    0005

    Now your Gmail Fully configured in your outlook. You will get all mail to your inbox or outlook. Then you can use very friendly. Enjoy…. With Google email ….. !

    Filtering E-mail by Regions in Outlook 2003 & 2007

    1. Open Outlook 2003 or 2007

    2. Click Actions --> Junk Mail Options

    3. In the Junk Mail Options window, click on Blocked Top Level Domain List

    4. In the Blocked Top Level Domain List window, scroll and select any country you wish to block, based upon the top level domain name assigned to that country. For example, if you wish to block Nigeria, click and select NG (Nigeria).

    5.  Click Ok.

    6. Back in the Junk Mail Options window, click on Blocked Encoding List.

    7. In the Blocked Encoding List window, scroll and select any encoding type you wish to block. Make sure you only block encodings for countries or regions you do not do business with. In English speaking countries, much of the legitimate email will use US-ACSII or Western European. I also add Hebrew to the list of NON blocked encodings.

    8. Click Ok all the way out.

    Yahoo mail configuration in outlook

    Yahoo! Mail users can read their email in Outlook Express by subscribing to the Yahoo! Mail Plus service. This service allows you to use Outlook Express or another POP3 client to access and manage your Yahoo! Mail messages.
    Outlook Express allows you to add a new email account to your existing profile. This means you do not have to replace your current settings in order to send and receive Yahoo! Mail messages. Here's how:
    From the Tools menu, choose "Accounts."
    Select the "Mail" tab.
    Click the "Add" button.
    From the Add menu, click "Mail."
    In the text box labeled Display Name, type your name and click "Next."
    In the Email Address box, type your Yahoo! Mail address (be sure to include "@yahoo.com") and click "Next."
    Under "My incoming mail server is a..." select "POP3."
    Type "pop.mail.yahoo.com" in the Incoming Mail (POP3, IMAP, or HTTP) Server box.
    Type "smtp.mail.yahoo.com" in the Outgoing Mail (SMTP) Server box.
    Click "Next."
    In the Account Name box, type your Yahoo! Mail ID (your email address without the "@yahoo.com").
    In the Password box, type your Yahoo! Mail password.
    If you want Outlook Express to remember your password, check the "Remember password" box.
    Do not check the boxes labeled "Log on using Secure..."
    Click "Next."
    Click "Finish."
    Important: The Yahoo! Mail SMTP server now requires authentication. To turn this setting on:
    From the Tools menu, choose "Accounts."
    Select the "Mail" tab.
    Double-click the account labeled "pop.mail.yahoo.com."
    Select the "Servers" tab.
    Check the box next to "My Server Requires Authentication."
    Click "OK."
    To control deletion of messages from the Yahoo! Mail Server:
    From the Tools menu, choose "Accounts."
    Select the "Mail" tab.
    Double-click the account labeled "pop.mail.yahoo.com."
    Select the "Advanced" tab.
    In the Delivery section at the bottom of the window, check "Leave a copy of messages on server" if you want to save your Yahoo! Mail messages on the Yahoo! Mail server as well as on your local computer. Do not check this box if you want your messages to be deleted from the Yahoo! Mail server once you have received them in Outlook Express.
    If your ISP blocks port 25 or if you're unable to send email, then you will need to use port 587 when sending via Yahoo!'s SMTP server. To make this change, please follow the directions below:
    From the "Tools" menu, select "Accounts"
    Select your Yahoo! POP account and click on the "Properties" button
    Click on the "Advanced" tab
    Next to "Outgoing server (SMTP), change port 25 to 587
    Click "Apply", then click "OK" and "Close"

    Change email password through OWA

    1. Click Options button from bottom of Outlook Web access window. (Figure 1)

    clip_image001

    Figure1

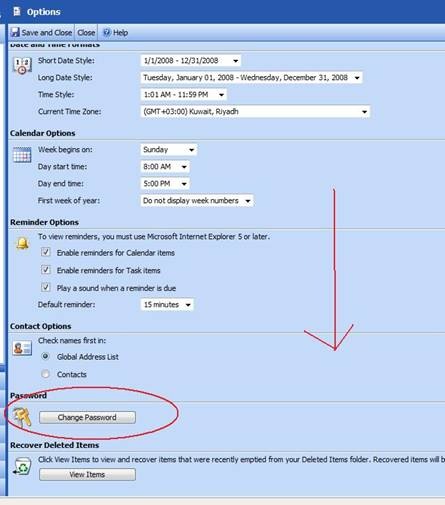
    2. Go to Bottom and click Change password Button. (Figure 2)

    clip_image002

    Figure2

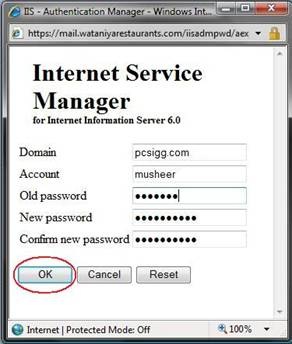
    3.    TypeinDomainBox: yourdomain.com(pcsigg.com)TypeinAccountBox:username((first part of your email address, i.e. musheer) Type in old Password Box: current password

    Type new password: new passwordConfirm new password: new password

    AndclickOKbutton.(Figure3)

    clip_image003

    Figure3

    Configuring Outlook Anywhere

    1. Close Outlook

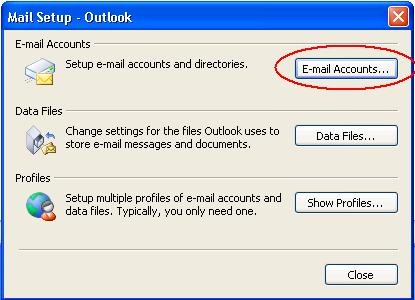
    2. Go to Control panel > mail > email accounts… (Figure 1)

    clip_image001

    Figure 1

    3. Click Add a new email account (if you have an existing account, click View or change existing e-mail accounts) and Click Next (Figure 2)

    clip_image002

    Figure 2

    4. Select Microsoft Exchange Server and click Next (Figure 3)

    clip_image003

    Figure 3

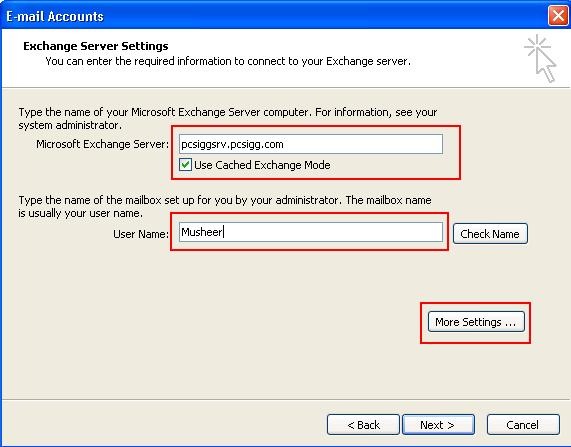
    5. In the Microsoft Exchange Server box, enter Fully qualified domain (pcsiggsrv.pcsigg.com)

    6. Check Use Cached Exchange Mode

    7. Enter your username (first part of your email address)

    8. Click More Settings (Figure 4)clip_image004

    Figure 4

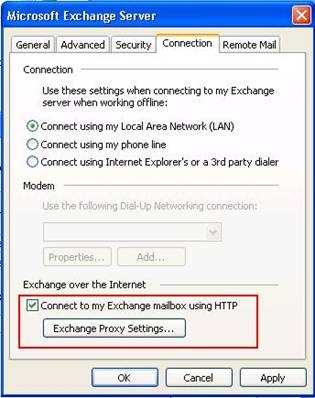
    9. Click the Connection tab

    10. By default, Connect using my Local Area Network should be selected

    11. Check the box to “Connect to my exchange mailbox using HTTP

    12. Click the Exchange Proxy Settings button (Figure 5)

    clip_image005

    Figure 5

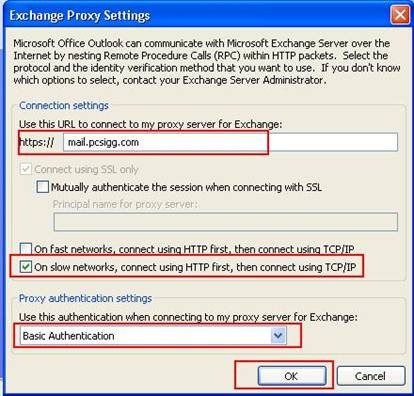
    13. Enter mail.yourdomain.com (mail.pcsigg.com) as the URL

    14. Check “On slow network, connect using HTTP first, then connect using TCP/IP”

    15. Set the Proxy authentication settings to Basic Authentication. (Figure 6)

    16. Click OK

    clip_image006

    Figure 6

    17. Click OK and Next

    18. When prompted to enter your login and password, enter USER@pcsigg.com (i.e. musheer@pcsigg.com) and your account password. You will be prompted to enter your credentials each time you open outlook. Your password can not be saved using this configuration.

    19. Click Finish

    20. Before you Launching outlook, go back to Control Panel > email > Email Accounts…(Figure 1)

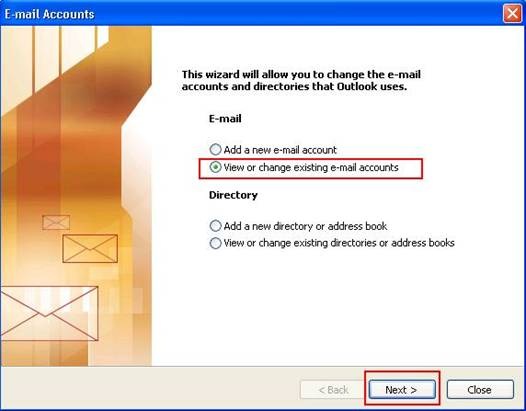
    21. Click View or change existing e-mail accounts and Click Next (Figure 7)

    clip_image007

    Figure 7

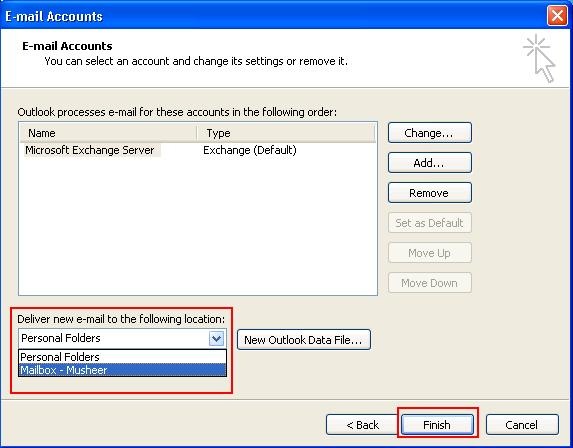
    22. Click dropdown selection of Deliver new e-mail to the following location and change to Mailbox – Username (i.e. Mailbox – Musheer) and click Finish.(Figure 8)

    clip_image008

    Figure 8

     
    Copyright 2008 IToxy